Saturday, 17 August 2013

Folksy Summer School!

Last weekend I had a fantastic weekend at the Folksy Summer School. If you are not familiar with Folksy, it's an online marketplace for all things handmade. The summer school was intended to help the talented entrepreneurs to take their craft to the next level.


There were masterclasses on everything from sale & marketing, to blogging & photography.
Along with the speakers presenting, there were craft demonastrations, great food and you could have one-to-one tutorials with industry experts.


I was invited along as a case study for business growth. I always get really nervous when speaking to groups of people, but somehow, all the friendly faces put me at ease and I was able to present without getting all breathy & weird. 

Tilly from Tilly & The Buttons was there to give her top tips for creating and running your own blog, (my pen was scribbling frantically for that half hour), and I was honoured to meet the lovely boys from Mini Moderns


My good friend James Green teaching Doug Richards how to make linocuts.
I had a fantastic time and really learnt a lot. I can't wait to start putting it all into practise. When they do it all again next year, I would highly recommend attending, even if it's just for the bonfire that Frankie & I started at the end of the first day!


What has inspired you recently?


DIY No-Sew Camera Bag!

Earlier this month I got a new camera (hooray!), unfortunately it was too big to go into my old camera bag, but it's a bit posh to sling into my handbag for days out. I had a look online for inconspicuous camera bags but didn't feel very inspired. That's when I had my "lightbulb moment", I could create a protective case which could convert any handbag into a camera bag!

The idea of this project is really very simple, you create lovely soft foam buffers which can be inserted into any handbag, thus turning it into a camera bag! Perfect! The biggest advantage is it will only take you around an hour to make and requires no sewing skills whatsoever!

What you will need:


- A bag big enough to hold your camera with a bit of breathing room around for padding
- A multi pack of washing up sponges
- Textile glue
- Super glue (not pictured here)
- Nice soft fabric. This is a scrap of brushed cotton left over from making pyjamas


For this bag I am going to make a block for the bottom, and a separate sleeve which will encase the camera. Pop some sponges in the bottom of your bag (scouring pads to the outside for added strength). Trim them down if necessary.


This is the bag with the sponges in. You can see the slightly awkward wedge shape, but the sponges fit will inside without being trimmed.


Now this is where I made a bit of an error. I used the textile glue, but it wasn't strong enough to create a strong, instant bond as the sponge was too absorbent. I would recommend using a super glue instead, the sort you get in small tubes and usually says "bonds in seconds!' on the packet.


Once you have glued the sponges in pairs, glue them end to end too.


This is after I realise my mistake and started using the super glue instead.


Your finished, glued block should look like this.


Place the glued block in the bottom of your bag. Pop you camera in, and space the remaining sponges around it. My bag looked too bulky with full sponges surrounding it, so I had to cut them in half.


It's easiest to do this with a bread knife. Use long strokes away from you and it's really simple to cut through.


You will end up with them looking a bit like this.


Now you have to cover them with fabric. Make sure you cut a piece large enough that you get a little bit of an overlap.


Using the super glue again, stick the fabric onto both ends of the block first.


This is probably the fiddliest part. Fold the fabric in so you can neatly wrap the fabric around the block without the need to seal the ends up again. I hope that makes sense.


You will need to fold the fabric at 45 degree angles so the folded edge of the fabric is flush with the ends of the sponge block.


Do the same at the other end, and glue.


Wrap the long bit of fabric around, and glue.


You should have a block that looks a bit like this.


Now for the sleeve cushion. You will want to have a longer tab of fabric at one end (the left side in this case). Glue any pairs together as before. Leaving gaps of 2-3cm between each cushion pad (to allow for the corners) glue each pad individually to the fabric.


Pop some glue on the ends of the pads, and lift the fabric up. I have used mini bulldog clips to hold the fabric in place here as I had ran out of super glue by this point and had to use the slower bonding textile glue instead.


Wrap the pads up, and glue along the long seam. The stripes in the fabric really helped to keep everything in line at this point. At the end, glue the long tab onto the last pad, remember to leave a bit of a gap for the corner.


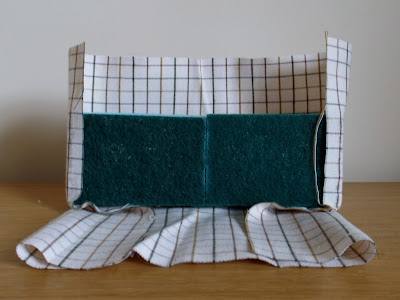
It should look a bit like this.


Here are the 2 pads together.


Once they have dried fully, pop them into your bag, and try your camera out for size!


I would love to see your camera bag creations if you decide to give this a go!

Wednesday, 14 August 2013

What am I making?

I know we haven't known each other for very long, but one thing you need to know about me is that I LOVE a good project. Whether that be craft, DIY, research, anything! I love learning new skills, perfecting old ones and the sense of satisfaction you get from completing something.


Introducing my current project, a navy blue linen summer frock. I bought the pattern second hand from a local vintage shop, the fabric was purchased from Abakhans on the Wirral. I will be making the full skirted version on the left (green), but with the short sleeves & wide neck.


When sewing any dress of this sort, the construction is essentially the same. You start with a bodice. Usually a solid piece, and the back is in two sections to allow for the zip. Shaping is given to the bodice with a small number of darts. These are very simple to do. Essentially they are a pinch in the fabric with is sewn in order to fit the bust & waist better.


This bodice is a little bit different to others. The sleeves are inserted as a raglan sleeve, essentially making the top of the sleeve part of the neck line (like a baseball top). I think this is a really nice detail (if it works out ok) and I think if I use the pattern again, I will perhaps cut the sleeves in a nice contrast fabric to emphasise this feature.


Once you have completed the bodice, the skirt is constructed. A full skirt like this one will require gathers or pleats so it nips in at the waist, while remaining nice and full at the hem. I will more than likely pop some pictures up of this process when I get round to another sewing day!


Judging by the mixed weather we're getting at the moment, i'd best get a wiggle on and complete this dress soon or else the lovely sleeves will have to be covered by think woolly cardigans! Have you got any current projects on the go? I'd love to hear about them!

Monday, 12 August 2013

BBC Sheffield & Portland Works

It's funny that even when something is right on your doorstep, you might never visit it.

This was the case for me and Portland Works. I had heard a lot about it, and followed their story for a couple of years. They were trying to buy the building off the owner when it faced being converted into flats, thus ending 130 years of manufacturing history. But had never visited in the 6 years I have known  Sheffield.


That was until Friday, when I was invited back onto Rony's show for a 100 years of Stainless special. The show was broadcast live from Portland Works, and I was amazed by what I saw.


At the entrance you are greeted by a higgledy piggledy selection of post boxes which help to give you some indication of the variety of businesses, artisans, craftspeople, cutlers, creatives and musicians that all call Portland Works 'home'.

The whole place is a cluster of tiny workspaces, filled with all manner of tools, machines, materials, piles of bricks and wonky doors. It's utterly charming but also completely functional for the needs of the tenants.


If you have yet to visit this amazing collection of creativity that is right on our doorstep, I seriously recommend a trip down. It is steeped in history and completely inspiring. Their next open day is part of the National Heritage Open-Up Weekend. They are opening their doors on Sunday 15th September and will be running a series of workshops and demonstrations. Find out more here.


After opening it's doors in 1877, it is one of the earliest surviving examples of an integrated metal trades complex. Portland Works was the first place to manufacture the famous Stainless Steel. The buildings were saved following a community effort to sell shares in the Works. They raised enough money to complete the purchase, and are now in their second phase of share selling to complete vital repair works.


I can clearly see why it was so importnant for them to save Portland works. Not only to preserve the past, but the secure the future for these micro businesses. You can find out more about purchasing shares and helping this amazing place by visiting this page.


Outside Portland Works there are a series of posters advertising the sorts of skills contained within their brick walls. You can find Stuart Mitchell - a knife maker who learnt his craft from his Father. Mary Sewell - A fine artist.


Paul Hopprich - Specialising in quality cabinetry. Mark Jackson - 'Squarepegs' an innovator of an contemporary coat hook system for schools.


During the programme "Rony's friends" I was joined by Ron C a.k.a Mr Sheffield. The point of the show is to discuss various topics in the news. We covered all sorts of topics from whether you own any Sheffield Stainless Steel (which I do thanks to the fabulous butter knives in this post), whether brides should do a speech at their own wedding, Don Valley Stadium potentially being saved as a community asset (similar to Portland Works), rent-a-bikes in Sheffield, and the internet! We covered a lot of ground and I always find it really interesting to see what the other 'friend' has to contribute to the same topic.

As I don't own a TV, or read newspapers, I always find it a bit tricky to talk about news topics, but somehow I am able to muster up enough passion that I keep getting invited back!


Tuesday, 6 August 2013

The great knitting machine experiment!

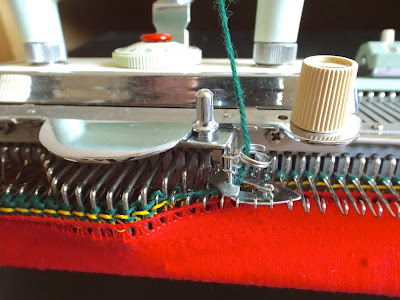
In my last post I shared some car boot sale purchases with you, and among them were a number of cones of wool. Normally I would avoid any wool thinner than 4-ply because it just takes so long to knit up (and even 4-ply is pushing it if it has a lot of pattern in it), but while I was looking at them, I suddenly remembered that I had a vintage knitting machine sat in my wardrobe at home.


I had bought it about 6 years ago for £3 from my favourite charity shop (they used to put absolutely EVERYTHING out, but unfortunately they flooded and never reopened), and after one disastrous attempt at knitting a scarf/tie for James, I never got it out it's box again. The downside of a knitting machine is that it's not terribly portable, and it takes up a lot of space as it's so wide. You have to clamp it to a table top and will struggle to put it away during the making of your project. However, the upside of a knitting machine is that you knit by the row, rather than the stitch. In laymen's terms, it's FAST! So fast in fact that I managed to complete knitting a summer top from 3-ply wool in approximately 4 hours, including the time taken teaching myself to use the machine again.


It really is so simple to do, and you don't need any previous knowledge of hand knitting to be able to do it. The results look like hand knitting, feel like hand knitting, but take you just a fraction of the time to complete. I estimate that I could knit myself a lovely mohair jumper for winter in about 10 hours knitting time. Something which would take me weeks to do by hand.


I'm still only in the beginners stages of using a knitting machine, but the instruction book promises lots of potential for using different colours of yarns combined with some basic stitch techniques for great results.


I bought a retro machine knit pattern book separately from my machine, and reading through it, it seems that knitting machines progressed very quickly in terms of the complexity of designs you can create. You use pattern cards, which I assume you pop into the machine like a cartridge, or perhaps slot onto the needles, to create beautifully intricate fairisles, cables and more. My machine seems to be one of the early very basic models, but I think it will suit me just fine while I'm getting to grips with this great new hobby.


Whilst I love the speed with which I can create a simple garment, I still think there is something beautiful in a hand knitted jumper. Each stitch passed over the needles, perhaps while daydreaming about who you're going to give the jumper to. The finished item sort of oozes love, care and skill. I wonder if I'll be able to get the same effect with my machine? Hand knitting is extremely portable, and you can create very intricate patterns, I love learning new stitches and seeing how a combination of knit and purl can create such varied effects. When you first start following a pattern it's a bit like doing a dot-to-dot picture, where the whole image only starts to reveal itself after you've joined most of the dots together.


I will post about my finished summer top once I've finished sewing it up. It's taking forever!

Have you tried machine knitting before? Are you a complete knitting novice? Would you be tempted to give it a go if you saw a machine for sale? Would you like to see a more in depth post about the process os machine knitting?