Showing posts with label DIY. Show all posts

Thursday, 20 March 2014

DIY No-Sew Marilyn Monroe Costume


This was a costume I made for a Halloween party last year. It was free to make (as I already had everything in) and took roughly an hour! It's a Marilyn Monroe inspired costume and is really REALLY simple.

You will need:
- 1 x fitted bed sheet
- Scissors
- Popper fastening / button / velcro / safety pin / whatever you have to hand. It's just to fasten the skirt with and will be hidden by the waistband anyway.
- Pin
- String
- Tailors chalk / pen / pencil
- Tape measure
- Boob tape!

I have kept the instructions as graphic & simple as possible, but if you need any elaboration please get in touch in the comments section below.


The next bit is possibly the only tricky bit. You will need to do a bit of maths so you don't cut a hole that is too big. 
Measure your waist and divide that number by 3. Then half that figure. e.g. if you have a 36" waist, you will need a 6" length of string from the pin to cut your waist hole. Does that make sense? 


You can also hem the bottom of the skirt if you're feeling fancy. I didn't as it was halloween and I was going for a slightly more bedraggled look.

Now you just lay the top section around your neck and tape it to your bust. Put on the skirt section over the top and fasten. Then wrap the waist band twice around your waist and tie with a side bow! Simple!

I'd love to see your photos of the finished fancy dress costume!


Saturday, 15 March 2014

DIY How to clean a vintage bicycle

I LOVE cycling, I cycle to and from my studio every day, rain or shine. Since moving house my beloved bike has had to be kept in the outhouse (with it's front tyre sticking out). Although I use it every day, I really neglected it on the maintenance front.


On the Sheffield hills it was really dragging, making strange clicking noises & it was covered in rust. When I really looked at it in daylight, I was pretty embarrassed by how I had let it get. However, this is a story with a happy ending, with a bit of TLC I have brought my bike back to life and it's whizzing up and down the hills better than ever!


So what do you need? Surprisingly, not a lot.
- Selection of wire brushes
- WD40 (I was told afterwards that GT85 is less corrosive, but I had a LOT of rust to get through)
- Lubricating maintenance spray
- Lube (no tittering please)
- Multitool
- Brooks Proofide (if you have a leather saddle)
- Bucket of warm soapy water (washing up liquid is fine)
- Selection of clean but old tea towels, soft sponge, dish cloths
- Mr Muscle furniture polish (optional)


Ok, that looks like a lot, but most of it you will have lying around the house. 


I started by giving the chain & cogs a good spray with the WD40 so it could do its thing while I worked on the disgraceful wheels. 

Using the stiffest & medium brush I started removing the rust. It's a bit labour intensive, you have to scrub between each spoke, but you get a big payoff really quickly!


Next start scrubbing the chain and cogs with the brushes again. Once you have got the majority of the rust off, you can reapply some WD40 and start moving the pedals backwards while holding a tea towel around the chain.  This will help get even more muck off.

Make sure you are happy with the results of the rust removal before you start cleaning the frame, as it will just flick dirt all over you freshly cleaned bike if you go back to it.

With some hot soapy water and a sponge start working from your seat post and handlebars down onto the frame, clean the wheels and pedals, then do the gears and chain last. 

Dry it off with a clean tea towel, then apply the polish to the frame only! Don't polish your wheels as it will affect the braking power. 

Spray your bike maintenance spray on all the moving parts of your bike, including brake levers, inside the gear changers, pedals, cogs etc. 

Grab the lube and pop one drop on each chain link, then slowly turn the pedals backwards to help the lube soak down. If you have Sturmey Archer gears (built into the back wheel hub) there should be a little cap, open it and pop some lube in there too. 

Finally you can get the Proofide and using a soft cloth, work it into the leather. 

And voila! Your bike is road worthy again and you will be receiving glances for all the right reasons!


Friday, 14 March 2014

Little wooden chaps!

A couple of months ago I received an email from Cat Powel, who is the Art Felt manager for the Sheffield Children's hospital. She needed volunteers to help paint some little wooden figures that they use in the speech & hearing department. They were in need of a little bit of love after many years of use. I applied for a little gang of them to be sent out to me, and they arrived looking a little bit like this.


The one at the front with the red hat on is the bus driver. The figures are used during hearing tests. When the child can hear a tone, they place a figurine into a vehicle. I was asked to repaint the figures to reflect the diversity of the hospital visitors, but I had creative licence to do what I liked design wise... 


I wanted to keep some characters as people (as they are extremely well loved around Sheffield), but I also wanted to put my own twist on them, which meant animals!

These are the finished figures. 


I was really pleased with how they turned out, and hope they get many more years of love in the future. I'm now awaiting my next batch of items to be delivered for painting (vehicles this time I think). 

If you would like to get involved in the project, please contact Cat who I'm sure would love to hear from you! http://www.tchc.org.uk/artfelt-contact-us

Saturday, 17 August 2013

DIY No-Sew Camera Bag!

Earlier this month I got a new camera (hooray!), unfortunately it was too big to go into my old camera bag, but it's a bit posh to sling into my handbag for days out. I had a look online for inconspicuous camera bags but didn't feel very inspired. That's when I had my "lightbulb moment", I could create a protective case which could convert any handbag into a camera bag!

The idea of this project is really very simple, you create lovely soft foam buffers which can be inserted into any handbag, thus turning it into a camera bag! Perfect! The biggest advantage is it will only take you around an hour to make and requires no sewing skills whatsoever!

What you will need:


- A bag big enough to hold your camera with a bit of breathing room around for padding
- A multi pack of washing up sponges
- Textile glue
- Super glue (not pictured here)
- Nice soft fabric. This is a scrap of brushed cotton left over from making pyjamas


For this bag I am going to make a block for the bottom, and a separate sleeve which will encase the camera. Pop some sponges in the bottom of your bag (scouring pads to the outside for added strength). Trim them down if necessary.


This is the bag with the sponges in. You can see the slightly awkward wedge shape, but the sponges fit will inside without being trimmed.


Now this is where I made a bit of an error. I used the textile glue, but it wasn't strong enough to create a strong, instant bond as the sponge was too absorbent. I would recommend using a super glue instead, the sort you get in small tubes and usually says "bonds in seconds!' on the packet.


Once you have glued the sponges in pairs, glue them end to end too.


This is after I realise my mistake and started using the super glue instead.


Your finished, glued block should look like this.


Place the glued block in the bottom of your bag. Pop you camera in, and space the remaining sponges around it. My bag looked too bulky with full sponges surrounding it, so I had to cut them in half.


It's easiest to do this with a bread knife. Use long strokes away from you and it's really simple to cut through.


You will end up with them looking a bit like this.


Now you have to cover them with fabric. Make sure you cut a piece large enough that you get a little bit of an overlap.


Using the super glue again, stick the fabric onto both ends of the block first.


This is probably the fiddliest part. Fold the fabric in so you can neatly wrap the fabric around the block without the need to seal the ends up again. I hope that makes sense.


You will need to fold the fabric at 45 degree angles so the folded edge of the fabric is flush with the ends of the sponge block.


Do the same at the other end, and glue.


Wrap the long bit of fabric around, and glue.


You should have a block that looks a bit like this.


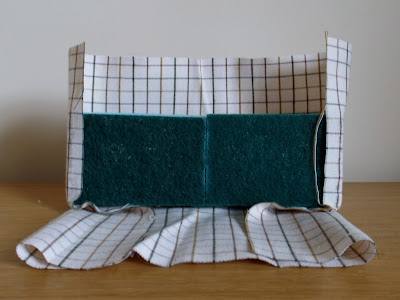
Now for the sleeve cushion. You will want to have a longer tab of fabric at one end (the left side in this case). Glue any pairs together as before. Leaving gaps of 2-3cm between each cushion pad (to allow for the corners) glue each pad individually to the fabric.


Pop some glue on the ends of the pads, and lift the fabric up. I have used mini bulldog clips to hold the fabric in place here as I had ran out of super glue by this point and had to use the slower bonding textile glue instead.


Wrap the pads up, and glue along the long seam. The stripes in the fabric really helped to keep everything in line at this point. At the end, glue the long tab onto the last pad, remember to leave a bit of a gap for the corner.


It should look a bit like this.


Here are the 2 pads together.


Once they have dried fully, pop them into your bag, and try your camera out for size!


I would love to see your camera bag creations if you decide to give this a go!